
BUILD & EXPLORE
Magnetic Tile Symmetry Activity: Build a Mirror Pattern
Make a flat mirror pattern with magnetic tiles. Follow a six-square challenge, check each matching pair, and try a simple classroom version.
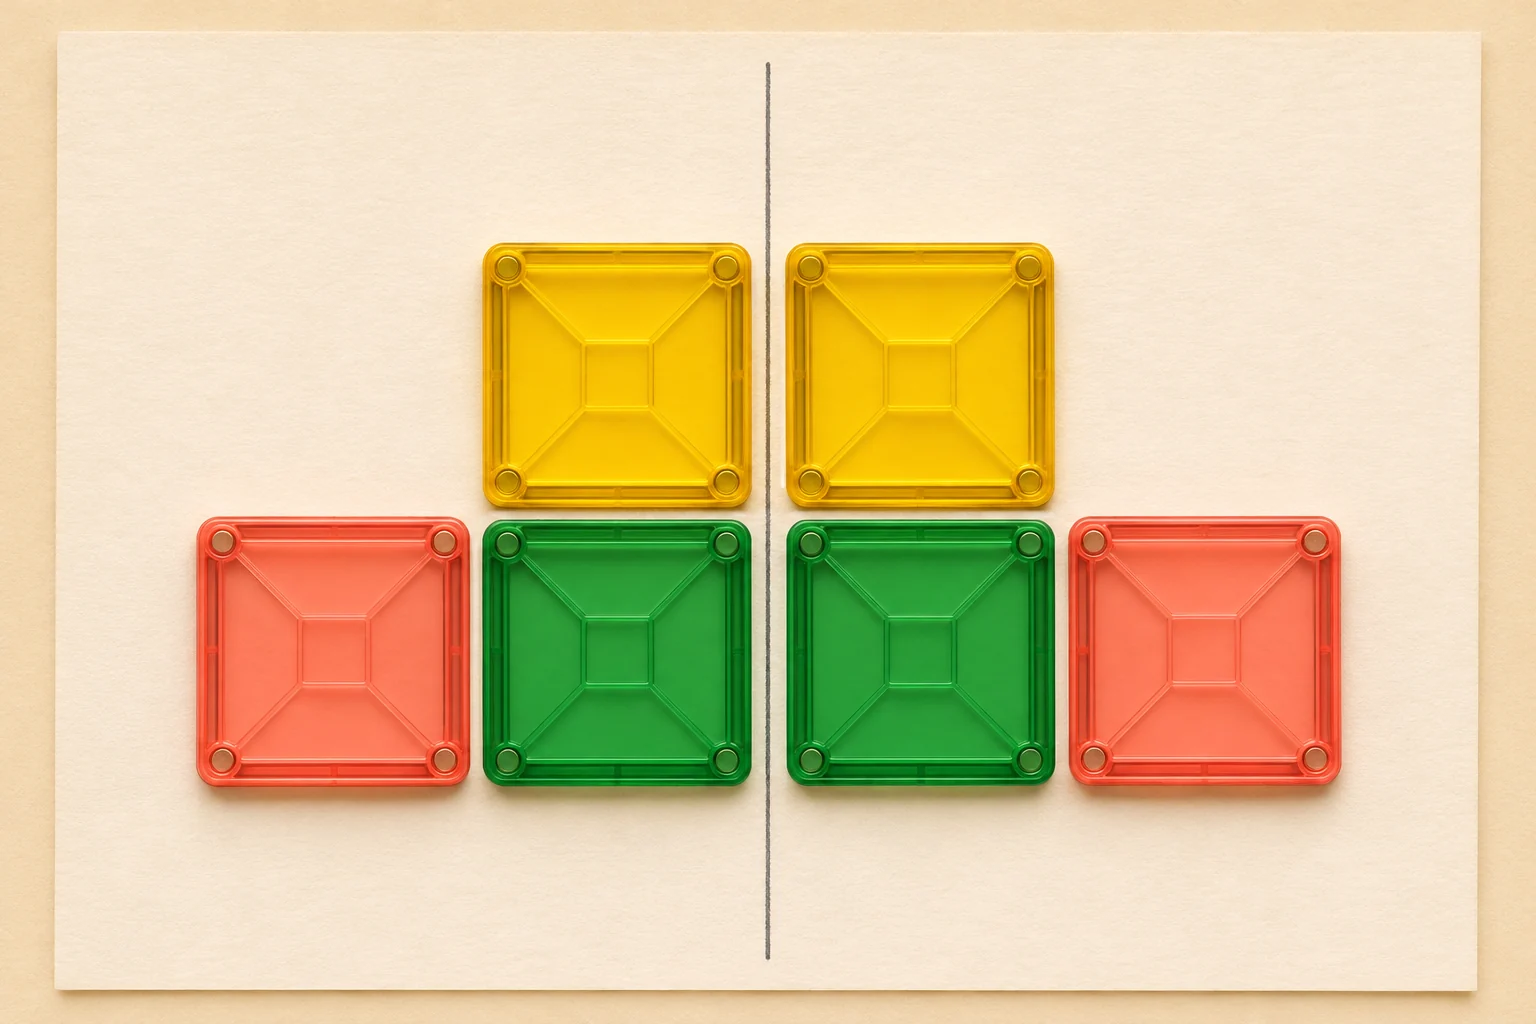
A line down the middle of a sheet of paper can turn a few magnetic tiles into a symmetry challenge. Make a small arrangement on one side, then place its mirror image on the other. Start with two squares and work up to a six-square pattern. Everything stays flat, and you do not need a mirror, a printed worksheet, or a large build.
Gather matching pairs and draw your line
Choose up to six square tiles of the same size, a large sheet of paper, and a pencil. Two squares are enough for the first round. For later variations, add a matching pair of triangles if you have them. Use the matching pieces available in your set. You do not need to use every piece in the set.
Draw a straight line from the top of the paper to the bottom, leaving space on both sides. Put the paper on a clear, level surface. Keep the tiles flat and off the line. They can touch neighboring tiles, but this activity also works with small gaps between pieces.
The MKGCRAFTED set is intended for children ages 3 and up. Adjust this activity to the child: begin with one matching pair and adult help, then add pieces when the child is ready to compare more positions. Follow the age guidance and instructions supplied with your set.
Start with one mirrored pair
A mirror pattern has corresponding shapes on opposite sides of the line. Each matching pair is the same distance from that line. With your line running top to bottom, matching corners should also be at the same height.
For the first round, compare shapes and positions without worrying about color. If you want the entire colored pattern to match too, choose the same color for each pair.
- Lay one square to the left of the line. Keep its sides parallel to the paper's edges and leave a small gap beside the line.
- Place a matching square to the right. Line up the top and bottom edges with the first square, and leave the same gap beside the line.
- Point to a corner on the first square, then its partner on the other square. Look straight across the line between them.
- Slide one square slightly farther from the line. Ask what you could move to make the pair match again.
Try the six-square challenge
Use three squares on each side to make two reflected L-shaped arrangements. Build the left half first, leaving the right half empty. The extra square on each side will extend away from the middle line.
If six matching squares are not available, use four to make two short columns. You can still compare the gaps and line up the matching corners.
- Place two squares one above the other on the left side of the line. Leave a small gap between this column and the line.
- Put the third square immediately to the left of the lower square. The left half now has one square in its top row and two in its bottom row.
- On the right side, place two squares in a matching column. Keep them at the same heights as the left column and the same distance from the line.
- Place the final square immediately to the right of the lower square in the right column. It should extend outward, opposite the extra square on the left.
- Check all three pairs. If you left spaces between neighboring tiles on one side, leave matching spaces on the other.
Check the reflection, not just the tile count
Three tiles on each side do not automatically make a symmetric arrangement. Imagine folding a picture of your pattern along the drawn line: each shape should land on its matching partner. Keep the actual tiles flat while you compare.
Work through four checks: Are the matching tiles the same shape and size? Are they equally far from the line? Are corresponding corners level? Does each part face the mirrored direction?
In the six-square pattern, both extra squares point away from the line. If you place both extra squares to the left of their columns, you have repeated the same arrangement instead of reflecting it. Move the extra square on the right to the outside of its column.
If only the colors differ, the shapes can still form a symmetric arrangement. Decide together whether this round is about the shapes alone or the full color pattern. That keeps the checking rule clear.
Turn it into a partner or classroom challenge
Give each pair of players a paper line and a small collection of matching tiles. One player makes a flat arrangement on one side; the other completes its reflection. Keep the original visible so both players can compare positions as they work.
Start with one or two pairs rather than a crowded picture. When the pattern is complete, swap roles. Each new arrangement should use shapes for which a matching partner is available.
- The first player places one tile and describes where it sits: near the line, farther away, above, or below.
- The second player places its reflected partner. Both players check the pair before adding another.
- After finishing, move one tile to a different position and invite the other player to move its partner accordingly.
- Ask each player to point out one pair that matches and explain how they checked it.
Change the line or the shapes
For a fresh round, clear the tiles and turn the paper so the line runs left to right. Build above the line and reflect the arrangement below it. Matching corners now line up vertically, with equal gaps above and below.
Try a matching triangle pair when squares feel familiar. Compare the direction of the corners as well as the distance from the line. Turn or flip the second tile as needed to make the reflected shape, then lay it flat. Return to squares if the orientation becomes frustrating.
Change one thing at a time: the number of pieces, the line's direction, or the shapes. A small pattern is easier to check carefully than a large picture with many unmatched parts.
Choose your next tile activity
Keep a simple sketch of a favorite pattern to use again, or let the next player invent a new half. There is no need to turn this flat activity into a standing structure.
For a different kind of challenge, explore the beginner-build guide in the Build ideas journal for flat pictures, small boxes, houses, and towers. Explore the MKGCRAFTED set or use the classroom and group-order link below if you are planning supplies for a group.
One small idea can lead to the next.
Find another build idea