
BUILD & EXPLORE
Magnetic Tile Castle: A Flat 12-Piece Layout
Make a flat magnetic tile castle with ten squares and two triangles. Follow the row-by-row layout, check the count, and try smaller or wider versions.
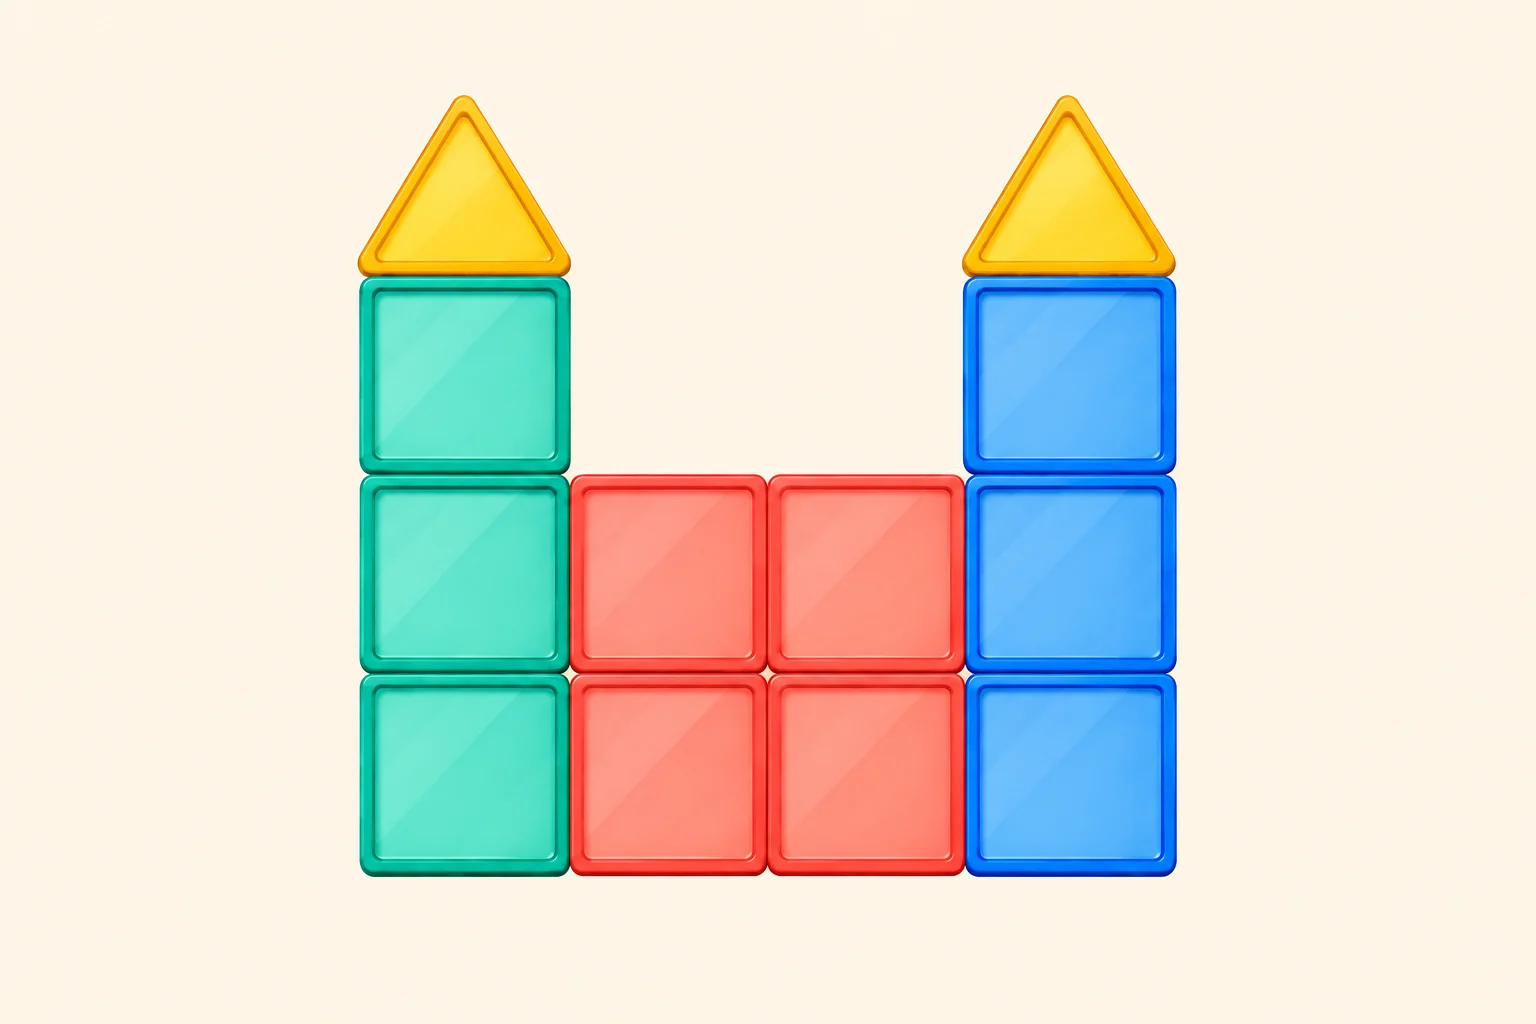
Make a castle picture with two pointed towers and a lower wall between them. This magnetic tile layout uses ten equal squares and two triangular roofs, with every piece lying flat on the table or floor. Follow the rows first, then change the size or invent a story for the finished castle. No standing walls, enclosed rooms or specialist castle accessories are needed.
Choose pieces that fit your set and your child
Gather ten square tiles of the same size and two triangles. For each triangle, choose a base edge that matches one square edge; that edge will sit beside the top of a tower in the picture. Colors are optional. The teal, coral, blue and yellow pieces in the illustration show the different parts, not a required color assortment.
Use pieces appropriate for the child's age and follow the age guidance, instructions and warnings supplied with your set. An adult can sort the shapes and start the first row for a younger builder who meets that guidance. Do not use this activity to extend a set below its labeled minimum age.
Choose a clear, level play surface and keep every piece flat. Here, above means farther up the picture on that surface, never stacked on another tile. This is an original activity concept with an AI-generated illustration; it has not been physically tested and does not show actual product photography or verified box contents.
Plan the castle in three parts
Think of the castle as a left tower, a middle wall and a right tower. Each tower is a column of three squares. The wall between them is a block of four squares arranged in two rows and two columns. Put a triangular roof above each tower.
That makes six tower squares plus four wall squares: ten squares altogether. Add the two roof triangles for a twelve-piece picture. Count the suitable shapes you actually have rather than assuming a set's total piece count tells you how many equal squares it contains.
Lay out the castle one row at a time
Place the bottom row nearest you and work away from it. Leave enough space for three rows of squares and the roofs. Align neighboring edges without overlapping the tiles; if the pieces do not sit comfortably together, leave small gaps and use the arrangement as a loose picture.
- Bottom row: lay four equal squares side by side in a straight line. The first and last squares begin the two towers; the middle two begin the wall.
- Middle row: place another square directly above each of the four bottom squares. You now have two complete rows of four, using eight squares.
- Tower row: place one square above the far-left column and one above the far-right column. Leave the two middle positions empty. All ten squares are now in the picture.
- Roofs: lay one triangle above each outer column, with its matching base edge beside the square and its point facing away from the bottom row. Keep the triangles flat.
- Look over the whole outline. Each tower has three squares and one roof; the central wall has four squares. Keep the finished picture on its surface rather than lifting it as one object.
Check the outline and fix shifted rows
Count the square rows from bottom to top: four, four, two. Then count the two triangles separately. This is a useful second check if counting each tower and the wall makes it easy to count a square twice.
If a tower appears to lean sideways in the picture, align the four-square bottom row first. Line up the squares immediately above it, then reposition the two top squares. You are straightening a flat arrangement, not testing whether a wall will stand.
If a roof overhangs its square, compare its chosen base edge with the square edge. Try a different triangle from your own set if one fits. If neither triangle has a matching edge, leave the roofs aside and make the ten-square outline; the castle does not need to match the illustration.
If neighboring pieces keep shifting, make one short section at a time or leave a small gap. Do not force pieces together or add another layer to hold them down. The suggested tile count describes the picture, not a guarantee about every brand's connections.
Make an eight-piece or fourteen-piece castle
Keep the same idea and change just one dimension. Set aside the pieces for the variation before rearranging the original picture.
- Smaller, eight pieces: make a bottom row of four squares, then add one square above each outer end. Each tower is now two squares long in the picture, with a two-square wall between them. Add the same two triangular roofs: six squares plus two triangles.
- Wider, fourteen pieces: return to the original twelve-piece layout. Move the right tower one square-width farther to the right and fill the new space in the central wall with two squares, one in each wall row. The wall is now three squares wide and two rows deep: twelve squares plus two triangles.
Turn the picture into a story
The tile outline can stay simple while the story changes. No figurines or extra accessories are required. Point to parts of the picture as you decide what happens next.
- Give the two towers different jobs: one could be a lookout and the other a place to send messages.
- Choose which part of the lower wall represents an entrance. Pretend with the picture as it is; this layout does not include an opening a toy can pass through.
- Name the castle and describe one visitor. Let the visitor's story suggest a change in color or width for the next round.
Choose the next build
Make a quick sketch or take your own photo if you want to recreate the layout. Separate and put away the pieces according to your set's instructions. You can begin again with the same twelve pieces or keep the smaller version for another session.
For other flat pictures and small structures, choose All build ideas and open 5 Easy Magnetic Tile Builds for Beginners. For a different toy-vehicle activity, try the open-top magnetic tile garage guide.
Use Explore the set to view the MKGCRAFTED 120-piece set, or Classroom & bulk orders to ask about group supplies. Check the available shapes before planning multiple castles; four copies of the twelve-piece layout would need forty equal squares and eight suitable triangles.
One small idea can lead to the next.
Find another build idea