
BUILD & EXPLORE
Magnetic Tile Cube Net: Arrange Six Squares and Fold
Make a magnetic tile cube net with six equal squares. Follow the flat layout, predict the lid, compare opposite faces and troubleshoot loose joins.
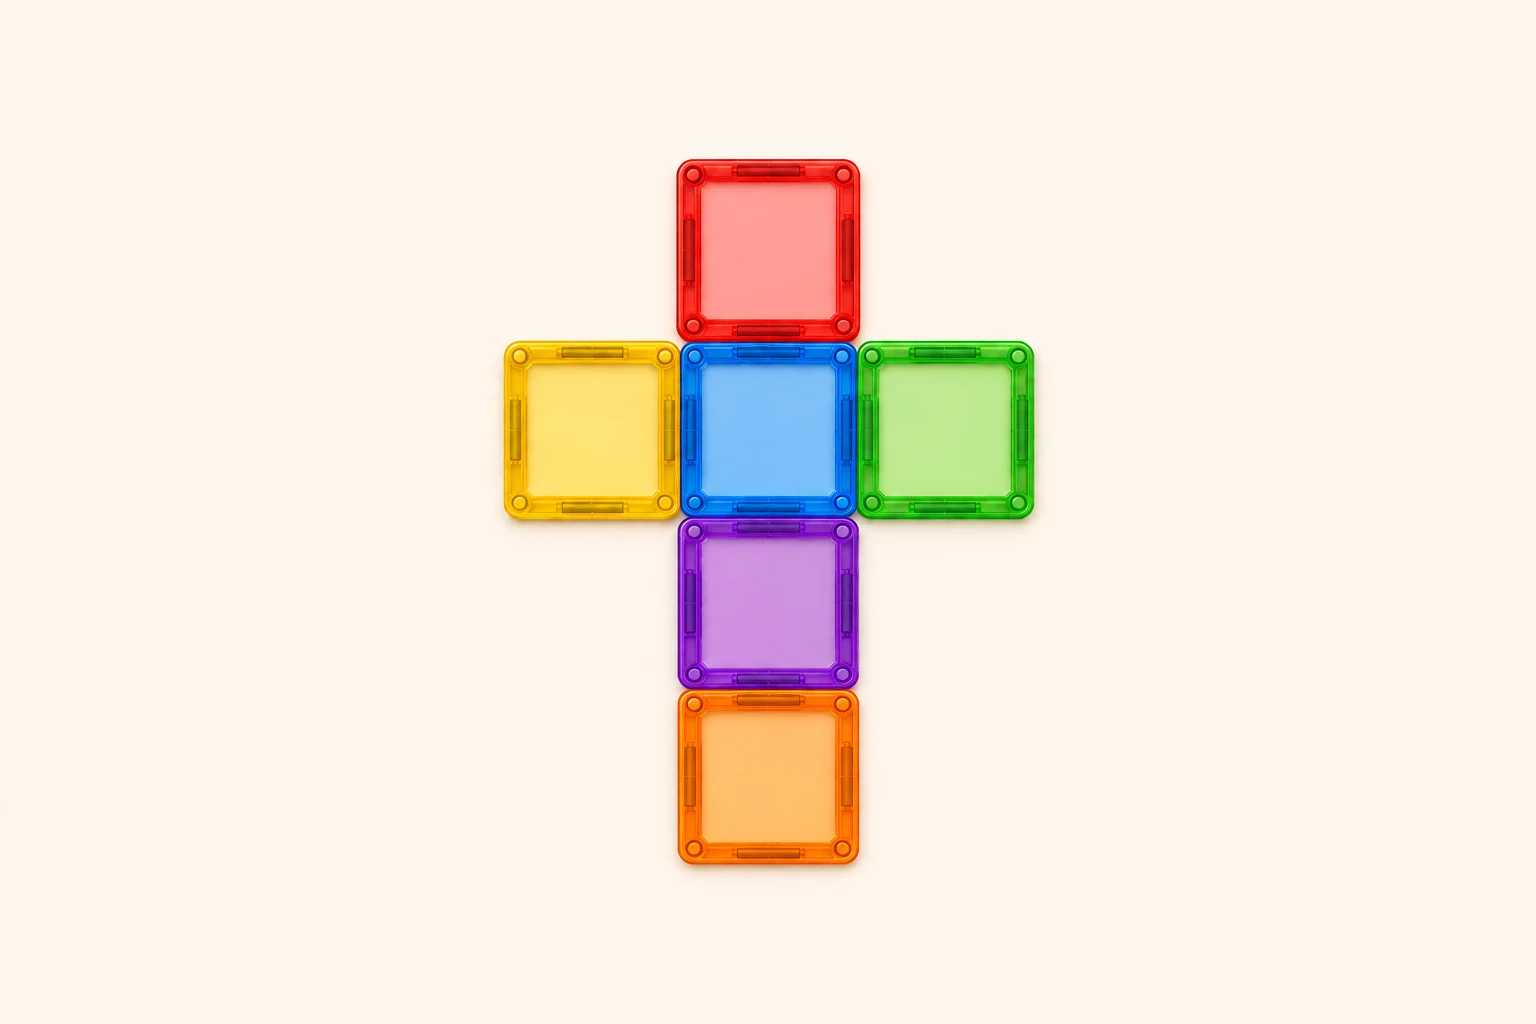
Which square will become the lid? A cube net starts as a flat arrangement of six equal squares, with each square becoming a different face when the net folds. Use this cross-shaped layout to plan a magnetic tile cube, predict where its faces will go and compare the result with your drawing. Support the panels as you move them; magnetic connections may release during folding.
Choose six equal squares
Gather six square tiles of the same size, plus paper and a pencil for a sketch. Different colors can make faces easier to track, but the colors do not need to match the illustration. Check the actual shapes in your set: a mixed set's total piece count does not tell you how many equal squares it contains.
Ages 7-11 are a suggested starting range for the prediction and face-matching questions. Adjust the help to the child and always follow the set's labeled minimum age and instructions. An adult or partner can support the loose panels while the other person moves one face.
The mathematical model treats each whole square panel as one face. All six faces must be equal squares. The layout below is one valid cube net; simply having six squares in any arrangement is not enough.
Lay out a column of four with two arms
Keep every tile flat on a level surface. Leave room for four squares from top to bottom and three squares across the widest row. Align neighboring full edges without overlapping the tiles.
- Make a straight vertical column of four squares, one immediately below the next.
- Find the second square from the top of that column. This will be the floor when you assemble the cube.
- Place a fifth square immediately to the left of the floor square, with their neighboring edges aligned.
- Place the sixth square immediately to its right. The floor now has a square above, below, left and right, plus one extra square farther below.
- Count the rows from top to bottom: one square, three squares, one square, one square. Count six in total, then sketch that exact arrangement before lifting anything.
Predict the walls and lid
Keep the square at the junction of the arms as the floor. The four squares directly touching it will become the four walls. The square at the far bottom end of the column will become the lid.
The top square on the flat drawing becomes a wall, even though it appears at the top of the page. The bottom-end square becomes the top face of the finished cube. Use the drawing's positions to explain your prediction before folding.
Mark floor, lid and the four walls on your paper sketch. Point to the corresponding tiles without moving them. Ask which two walls will face each other and which edges you expect to meet.
Move the faces into position with support
These steps describe the ideal face positions. Try folding only where your tiles can turn comfortably at their connections. Magnetic edges are not paper hinges: if a join comes apart, support and reconnect the faces in the intended positions. Never force a connection to bend.
- Keep the floor square flat. Raise the left and right arms into upright walls, with a partner supporting them if needed.
- Raise the square directly above the floor into the third wall. Bring its side edges beside the two upright walls.
- Raise the square directly below the floor into the fourth wall. Support the extra end square as you move this wall so it does not pull the connection apart.
- Bring the end square over the opening as the lid. Its intended position is directly opposite the floor, with one square covering each of the cube's six faces.
- Compare the face positions with your sketch before taking the model apart. If several joins keep releasing, return to the flat net and use the paper-model option below.
Check the three pairs of opposite faces
Opposite faces face each other across the cube and do not share an edge. Track them from the flat net instead of guessing from which colors happen to be close on the table.
The floor square at the junction is opposite the far bottom-end square that becomes the lid. The left arm is opposite the right arm. The square directly above the floor is opposite the square directly below it.
Point to each pair on your sketch, then identify it on the assembled model if the panels are holding together. If colors repeat, use the position names on the sketch. A cube should have six different face positions; two panels occupying the same face do not make an extra face.
Separate a connection problem from a net problem
A tile falling away does not show that the mathematical net is wrong. Thick frames, loose connections or the way a panel is supported can interrupt the attempt. Return to the sketch and check where that face belongs before changing the layout.
If the lid is missing, count the column again. Three squares in the column plus two arms gives only five squares: an open box with no lid. This net needs four squares in the column and two arms beside the second square from the top.
If two panels try to occupy the same face, check where the arms attach and whether you have kept the junction square as the floor. Restore the one-three-one-one row pattern before trying again.
For a paper check, draw the same six adjoining equal squares. An adult can help cut around the outside of the whole net, keeping the shared sides connected. Crease along those shared sides and fold the four walls and lid. This checks the geometry without depending on magnetic joins.
As a comparison, sketch six squares in one straight row. Following its existing joins can wrap faces around a band, but it cannot supply all six different faces of a closed cube. Rearranging separate tiles into a cube is a different task from folding that unchanged row as a net.
Use a predict-and-check station
Give each pair six suitable squares and one sheet of paper if they are sharing a single model. Four pairs working at once need 24 equal squares. One partner can label the sketch while the other points to the panels, then they can swap roles.
Record three things: the flat arrangement, the predicted lid and the three opposite-face pairs. After an assembly attempt or paper check, compare the face positions with the prediction. Record a released connection separately from an arrangement that puts two squares on the same face.
For another round, draw a different six-square arrangement and predict its face positions before trying it. Keep the shared sides in the drawing fixed during the check. These magnetic-tile steps are a suggested adaptation of a cube-net activity; they have not been physically or classroom tested, and no particular learning outcome is promised.
Choose the next geometry or building activity
Use All build ideas to find Magnetic Tile Area and Perimeter for a flat comparison using the same number of squares. The beginner-build guide includes a five-square open box when you want to start with fewer faces. Each activity has a different goal, so keep the cube-net sketch for a later session.
Use Explore the set to view the MKGCRAFTED 120-piece collection. For group supplies, Classroom & bulk orders opens the inquiry page. Count the equal-size squares needed for each model before choosing supplies.
The illustration is AI-generated and shows the six-square net lying flat. It is a concept image, not actual product photography, evidence of a tested build or a promise of particular box contents.
One small idea can lead to the next.
Find another build idea